Tuesday, December 19, 2017

Birdhouse Christmas Wreath

Hello there! Anyone still finishing handcrafted Christmas projects? (I am lol.) I got some baking done today too. ;-) I'm delegating gift wrapping to my husband! Anyway, I was tired of my old door wreath so I finally got around to making myself a new one. I found a cool twig wreath base online and went from there.


I picked up various foliage picks from the craft store and pulled them apart to use for all the greenery and burlap leaves. The birdhouse and red bird are both dies from Eileen. They make it really fast and easy to put these guys together! I adhered my patterned paper to the mat board before I cut the parts out. (For the bird I glued red cardstock onto both sides of the mat board. The birdhouse I distressed a bit with Vintage Photo Distress Ink and added the wreath around the hole and some Industrious Sticker borders. I also smeared some Rock Candy Stickles on parts of it to give it some sparkle.

Once the house and bird were done and dry I just went to town with my hot glue gun and all the foliage parts. It was easy! It only took me an evening to make this up.

close up!


Thanks for stopping by and Merry Christmas! I wish peace and joy for you all (and not crazy busyness!)

I'm also entering this into the 'Anything Goes' December Challenge over at Emerald Creek Dares. Have you seen the sneak peek at the cool embossing powders they've teamed up on with Seth Apter?? I can't wait to see the full reveal at Creativations! =)

Dies Used:
Sizzix: 
Eileen Hull Birdhouse 3-D (Sizzix )
Eileen Hull Bird (Sizzix )

Other:
Sizzles matboard
Tim Holtz Paper Stash - Christmas
Distress Stickles - Rock Candy
Tim Holtz Adornments - Wreaths
Industrious Stickers - Borders
Ranger Collage Medium - MatteDistress Ink - Ground Espresso

Sizzix & Simon Says Stamp links in this post are affiliate links which do not affect the price you pay but allow me to earn a small percentage of a sale. Thanks! (My husband also thanks you!)

Thursday, December 14, 2017

Mixed Media Monthly December Challenge!

It's mid-month inspiration time over at Mixed Media Monthly. Our theme this month is 'Believe' and you still have time to enter!


Our sponsor this month is Boozybear, creator of unique chipboard shapes and stencils to inspire your mixed media projects. I love the detail in them. I used the following sets on my Christmas steampunk project:

yummy chipboard shapes!

… and here is my project, assembled in the large Vignette Tray:


I lined the tray with Christmas paper from my precious hoard of Basic Grey cardstock (guess I need to use it at some point lol). I added clear crackle texture paste to parts of it, especially in the corners. Once that was dry, I misted it with a green/gold Tattered Angels mist to get in the nooks and crannies and add a nice shine. The chipboard shapes I painted with various colors of Silks Acrylic Glazes. The clock hand 'ornaments' also got a coating of Stickles for more sparkle. The Fresh Cut Pine Die Set was perfect for adding Christmas tree branches.


To make the electrical cord for the light, I used Eileen Hull's Twist & Style Tool to twist some wire into shape:

There is the wire hiding under the branches.

The tool is really easy to use. Eileen recently did a FaceBook Live video where you can see how (you can forward through the chit chat to get to the how-to part). I also have a tutorial on how to use it to make flower stems (same idea) HERE.

Thanks for stopping by! Be sure to check out our MMM challenge posts (main & mid-month). We'd love to see you enter. =)

Also, I am entering this into the SanDee & amelie Steampunk Challenge Blog Winter Challenge. Check out the fun there too. ;-)

Dies Used:
AJVD:
Fresh Cut Pine Die Set

Chipboard Shapes Used:
clock mechanicals
shabby snowflakes
bulbs
gear cluster

Other:
Idea-ology Clock Key
Idea-ology Vignette Tray
Sizzix Twist & Style Tool
Distress Collage Medium - Matte
Kraft Core Classic Paper Stack
Silks Acrylic Glaze
Prima Texture Paste - Clear Crackle
gesso
Distress Paint - Tarnished Brass
Stickles - Purple, Pink, Twilight


Sizzix & Simon Says Stamp links in this post are affiliate links which do not affect the price you pay but allow me to earn a small percentage of a sale. Thanks! (My husband also thanks you!)

Tuesday, December 12, 2017

Featured in Cloth, Paper, Scissors Magazine!

Woo Hoo!!! I finally got my hands on a copy of the current issue of Cloth, Paper, Scissors magazine so I can share my happy news. =) Way back when they had a reader challenge called 'Make It Shine' where you had to create a holiday card that featured all sorts of shiny surfaces, mediums, etc. I entered and my card was selected as one of the winners!

Looky, it's in print! Yeah!

Here is a much better look at the actual card:


I used shiny cardstocks, glimmer mists, metallic ink and transfer foil to pile on the bling factor. =) I'm happy to finally be able to share this with you. Thanks for stopping by and Merry Christmas!

Dies Used:
Sizzix: 
Evergreen (Sizzix / SSS)
Prancing Deer (Sizzix ) retired
Holiday Words: Script (Sizzix / SSS)
Lace (Sizzix / SSS)

AJVD:
Scattered Stars Strip Die

Stamps Used:
Tim Holtz (S.A) - Fabulous Flourishes
Tim Holtz (S.A.) - Mini Holidays 2

Other:
Tattered Angels Mist - Sapphire
Ranger Perfect Pearls Mist -  Blue Smoke
Silver Pigment Ink
glue stick
Ranger Vintage Transfer Shiny Foil Sheets
metallic cardstocks
Distress Ink - Antique Linen

Sizzix & Simon Says Stamp links in this post are affiliate links which do not affect the price you pay but allow me to earn a small percentage of a sale. Thanks! (My husband also thanks you!)

Friday, December 8, 2017

NEW Eileen Hull eBook Just Published!

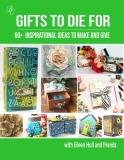
Hello everyone! Eileen Hull has a new book out, Gifts to Die For, that is stuffed full of ideas that are perfect for this time of year! From holiday decor ideas to the perfect way to package, or make the gift itself, you will find plenty of inspiration complete with links to supply lists and tutorials. It's only $9.97 through the end of December. I am fortunate to have several projects in the book and I've done a little roundup here of a few of the Christmas decor ones (click on the images to go to the original posts).

GIFTS TO DIE FOR with Eileen Hull and friends
click to see the details and purchase
Time to get festive with…


a gingerbread house built on a platform made from Eileen's Candy Drawer Die. A battery box for the mini lights incorporated into this decoration fits into one of the drawers!

SaveSave

A christmas tree perched on a base made with Eileen's Cookie Box Die. The top is hinged and you can tuck a small gift inside.


This ATB tower nativity scene is one of my favorite projects. It's made with the Block/Cube/Bank 3-D Die and Blocks/Cubes 3-D Die. It's a lovely reminder of what Christmas is all about.

Thanks for stopping by and I hope you check out the book! Stay tuned next week and I'll have another roundup of projects that are featured in it. Have a great weekend!

Sizzix is having another big sale this weekend! Check it out and take advantage of the prices. ;-)


Thursday, December 7, 2017

Christmastime in the Village

Hello! I am honored to be a guest designer on the Frilly & Funkie Challenge Blog today. The challenge theme is 'Most Memorable Gift'. When I was in grade school, I received a dollhouse one Christmas. I was ecstatic! It was a four room, yellow Victorian with real shingles! The inside was completely empty, waiting for my decorating touches. That gift sparked a passion for miniatures that lasted all the way through high school. As I got older, I gave away my dollhouse (my boys weren't interested lol) but I retained that love of tiny houses and settings. These days I indulge it by making little vignette boxes/ projects and of course diminutive settings for Tim Holtz Village houses. For this challenge, I decked out the village for Christmas! The neighbor down below is quite festive. ;-) 

(There are lots of photos!! Scroll on down past the supply list for the tutorial tips.)


I have decided I like the top loading lanterns the best because I can build
the whole scene outside the lantern and then just lower it in. Much easier!


The jingle bell garland around the top is merrily musical!

Here are details of the scene before I placed it into the  lantern:


I wanted to contrast the two neighbors. The house on the hill is a bit on the 'frilly' side while the person living down below is a bit 'funky' with their over the top Christmas decorating. I think it's quite fun all together!

Details:

The little snowman is made from paper clay and
covered with glitter (like my craft table!)

The Mini Christmas Things die set is perfect for making
all the lawn decorations for my little house. I was inspired
by a neighbor's house down the street. Their yard is stuffed full!

I used the Notebook embossing folder to make "siding" pieces to go
on all the walls of the blue house. Also, the pine tree cut hides the
light wire running down the corner of the house. ;-)

aaaand here it is with all the lights shining:


Whew! You made it through the first half of the post. Be sure to head on over to the Frilly & Funkie blog to check out the challenge and all the fab projects their design team made. Enter and you'll have a chance to win a $25 spending spree at the Funkie Junkie Boutique!

(In case you missed it, I completed a huge Halloween Village lantern project in October, check it out!)  


Dies Used: 
Sizzix (all Tim Holtz):
Village Dwelling (Sizzix / SSS
Village Manor (Sizzix / SSS
Village Bungalow (Sizzix / SSS
Village Rooftops (Sizzix / SSS
Village Landscape (Sizzix / SSS )
Village Christmastime (Sizzix / SSS)
Winter Wonderland (Sizzix / SSS)
Retro Merry Christmas (Sizzix / SSS)
Mini Christmas Things (Sizzix / SSS)
Paper Snowflakes (Sizzix / SSS)
Layered Snowflake - 660040 retired

A Jillian Vance Design:
Towering Tree Die set
Tranquil Tree Die

Other supplies:
Tim Holtz embossing folder Notebook
Tim Holtz Layering Stencils – Mini Set 28
Distress Ink – Antique Linen, Hickory Smoke, Pine Needles

Distress Oxide Ink – Broken China, Brushed Corduroy
Distress Spray Stains – Pine Needles, Cracked Pistachio, Mowed Lawn
Distress Dry Glitter - Rock Candy
Stickles Rock Candy, Pine Needles
Tim Holtz Ranger Grit Paste
Tim Holtz Mini Woodland Tree Lot
Tim Holtz Small Woodland Tree Lot
plaster cloth
Deco Art Snow paste (house tops)
Main base snow mixture 'goop': Cerulean Blue liquid acrylic paint, Prima Art Basics Light Paste, Prima Art Basics Gloss Gel, heavy body Titanium White acrylic paint

Simon Says Stamp and Sizzix links in this post are affiliate links which do not affect the price you pay but allow me to earn a small percentage of a sale. Thanks! (My husband also says thanks!)

********************************************************
All right, here we go with some tutorial action!
There are lots of videos on how to put together the houses, Tim Holtz has several on his blog. I'm mainly going to cover the base construction and lighting. See the tutorial on my Halloween Village blog post for more info as well.

I like to construct the bases out of foam core board (found at office/craft stores).


I played around with the placement of the houses and the trees before
gluing parts down.


I built up the terrain and filled in the supports with wadded paper and tape. Plaster cloth strips are easy to use and form nicely over the base.

oops, I forgot to take a photo after I did the plaster.

The roof lighting on the blue house was a bit tricky! Thanks goodness for fake snow; it covered up all the yucky wires and glue. I tacked all the wires in place with hot glue.


I wanted to have some shingles showing so I glued them around the edges. I also hot glued the bungalow dormers right on top of the wires. There was a big gap but that is what the fake snow is for. ;-)


I used a palette knife to spread on the snow texture paste and then sprinkled it with Rock Candy Dry Glitter while it was wet.


I used part of a garland of star LED lights I found at JoAnn's to light the houses themselves. I glued down a couple of bulbs where they would be underneath the houses and left the rest loose to position in the 'sky' once the base was inserted into the lantern. I then hot glued the houses in place and prepared my 'snow mixture goop'. I adapted a recipe I found on a model railroad landscaping tutorial to use media that I already had at hand (imagine that!) I used equal parts Prima Art Basics Light Paste, Prima Art Basics Gloss Gel, and Liquitex heavy body Titanium White acrylic paint. I added a tiny drop of Cerulean Blue paint. Once I spread it over the base I sprinkled it with the Rock Candy glitter. I had all my little decorations ready to go so I could stick them in the wet snow to glue them in place.

The battery boxes/switches for the light strands I fastened into the lantern lid with heavy duty hook and loop tape. You need to be able to swap the batteries in them!

Thanks for stopping by and checking out this really long post! I hope you are inspired. =) Merry Christmas to you all!
SaveSaveSaveSave

Monday, November 27, 2017

Sneak Peek!

Time for a little sneak peek at my A Jillian Vance Design card. ;-) Head on over to their blog to see the whole thing…


I hope you have a great week. Might be time to pull out the Christmas music bwhahahaha!

Friday, November 24, 2017

Eileen Hull e-Book Black Friday Sale!

Howdy all! I hope you had a wonderful Thanksgiving and are perhaps having some fun shopping today. ;-) Bella Crafts Publishing is having a Black Friday Sale and all their e-Books are 50% off! I have projects featured in both of Eileen's books, Die Cutting Magic and the Journal Treasury. They are chock full of inspiration. ;-)


Take a look by clicking on the graphics above! The sale is through this weekend. =) Thanks for stopping by! If you purchase an e-book, you will get an email with a link to go and download the book. Thanks for your support.

Tuesday, November 21, 2017

Magic in Fall Junk Journal

Hello there. I'm getting in a last autumnal hurrah before I dive headfirst into Christmas crafting! I spent this fall searching out and taking photos of all the beautiful colors changing around me. Fall is my favorite season and this year it was wonderful! I created a journal to hold all my photographic memories using Eileen Hull's Journal Die and a whole bunch of fall themed stamps and other goodies. Let's take a look!


The cover is covered with plaid wool fabric in fall covers. A removable elastic strap helps hold it closed since it is bursting with photos and ephemera!

here is a video flip though:


… and a few still shots of the interior pages!


I used Ranger Distress Collage Medium to glue the fabric to the mat board before I cut out the cover. It was dry enough that it didn't soak through the fabric and adhered it firmly.


Fall always makes me think of pumpkin spice lattes! Yum!


I took photos of our porch Halloween decorations. We grew most of the pumpkins in our garden. =)


There was a farm produce stand down the road from us that had an impressive display of cool pumpkins!


The leaves in our neighborhood were so gorgeous!


I got some fabulous photos of the Boise River. This is one of my favorites!


We had a field trip to the Botanical Gardens and that was lovely. I can't wait to go back in the spring and see all the flowers.


Inside back cover

Thank you for stopping by and for all those here in the USA, I wish you a happy Thanksgiving!


Dies Used:Sizzix: 
Journal (SizzixSSS)
Fresh Brewed (Sizzix / SSS)
Cobweb (Sizzix / SSS)
Vintage Lace - retired
Silly Monsters (Sizzix / SSS)
Tattered Leaves (Sizzix / SSS)
Harlequin Border (Sizzix / SSS)
Mini Acorn & Pumpkin Set (Sizzix)
Layered Leaf (Sizzix / SSS)

AJVD:
Grand Leaf Trio
Leaves & Petals
Sentiment Trio

Stamps Used:
Tim Holtz (S.A) - Thankful Silhouettes
Tim Holtz (S.A.) - Autumn Blueprint
Tim Holtz (S.A.) - Ledger Script
Tim Holtz (S.A.) - Falling Leaves
AJVD - Hello Fall
AJVD - Wood Grain Background

Other:
whole lotta fall colors of Distress Stain, Distress Ink, Distress Paint & Ranger Archival InkIdea-ology Clippings Stickers
Idea-ology Mini Clips
Idea-ology Big Chat
Idea-ology Chit Chat Seasonal
Idea-ology Small Talk
Idea-ology Flashcards

Sizzix & Simon Says Stamp links in this post are affiliate links which do not affect the price you pay but allow me to earn a small percentage of a sale. Thanks! (My husband also thanks you!)

Wednesday, November 15, 2017

Mixed Media Monthly November Challenge – "Silhouette"


Hello! It's mid-month inspiration time over at The Mixed Media Monthly Challenge Blog! Our theme this month is "Silhouette". Visible Image Stamps is our generous sponsor for this challenge and they sent stamps to all the design team members. I made a rockin' birthday card for my husband with them. ;-)


We hope that you join in this month's challenge! Head on over and check it out. =)

Stamps/Stencils Used: 
Visible Image - Rays of Light
Visible Image - Rock Out
Visible Image stencil - Fibres

Dies Used:
Sizzix:
Tim Holtz - On the Edge Star Cluster retired (SSS
Tim Holtz - Vintage Cabinet Card (Sizzix / SSS )

Other supplies:
Distress Paint - Mustard Seed, Wild Honey
Distress Stain - Wild Honey, Salty Ocean, Peacock Feathers
Distress Spray Stain - Fossilized Amber, Wild Honey
Distress Oxide Ink - Salty Ocean, Peacock Feathers
Ranger Archival Ink - Forget Me Not, Orange Blossom, Jet Black
Wendy Vecchi Embossing Paste - Metallic Gold
Embossing powder - Black, Gold
brayer


Simon Says Stamp and Sizzix links in this post are affiliate links which do not affect the price you pay but allow me to earn a small percentage of a sale. Thanks! (My husband also says thanks!)

Tuesday, November 14, 2017

Eileen Hull's Book Club Collection Release!

Hello, Eileen's new collection, Book Club, will soon be in the stores! This collection is chock full of cool dies but some of the coolest are the 3-in-1 dies. They are XL Bigz dies and are designed so you can make several different types of projects from the same cuts. My favorite is the Book & Pages, Trinket Box & Frame Die. (Check out the projects the Inspiration Team is sharing on Eileen's blog all this month. You will see the variety you can achieve!) I created a little winter scene in my trinket box:


I have a quick little tutorial for you. These are pretty easy to put together! To start, I cut all the pieces out of white matboard (I love how the Sizzix matboard takes ink.) For the inside of the box, I first smooshed Antique Linen and Pumice Stone Distress ink onto my craft mat, sprayed with water and then smooshed the matboard into the puddle and then dried it. Using the Bare Trees stencil, I made a monoprint over that.


Making a monoprint is easy. I used the Hickory Smoke ink pad to apply ink directly to the stencil. I then lightly misted it with water and placed it ink side down onto the background. It helps to press down on the stencil with a paper towel or cloth to absorb any extra water that squishes out.

I neglected to take more photos (oops) but the box goes together quite easily. Before assembly, I stamped the outside surfaces with a woodgrain stamp and Antique Linen ink. I then glued the box sides to the back and filled it before gluing on the front. I built up a little platform from scrap matboard so the tree and deer would be high enough to show properly in the window. I used Texture Paste to make the snow and covered it with Rock Candy Glitter.


The wooden birch tree, mini pine cones and wooden snowflakes I had in my stash. The base is an old wooden spool I painted white and wrapped with grey Jute Twine.

Thanks for stopping by! Ask about Eileen's new collection at your local scrapbook store. Also be sure to check out Eileen's blog to see what everyone else is sharing. =)


Dies Used: 
Sizzix:
Eileen Hull - Book & Pages, Trinket Box, Frame (Sizzix
Eileen Hull - Floral Arch & Words(Sizzix)
Mover & Shapers Mini Reindeer (Sizzix

Other supplies:
Dreamweaver Bare Trees Stencil
Tim Holtz Jute Twine
Tim Holtz Christmas Word Bands (retired)
Distress Glitter - Rock Candy, Vintage Platinum
Sizzles matboard
Distress Ink - Antique Linen, Hickory Smoke, Pumice Stone
Stickles - Rock Candy
Distress Collage Medium

Simon Says Stamp and Sizzix links in this post are affiliate links which do not affect the price you pay but allow me to earn a small percentage of a sale. Thanks! (My husband also says thanks!)

Monday, November 13, 2017

Sneak Peek!

It must be A Jillian Vance Design Monday! I have a sneak peek of the card I've posted over on their blog. Head on over to see the whole thing. ;-)


Wednesday, November 8, 2017

Village Church at Christmastime

My Tim Holtz Village Dwelling love continues! In case you missed it, I completed a huge Halloween Village project last month and now I'm turning my attention to Christmas projects. I made a little old fashioned country church scene for a crystal base I found at the thrift store. The church lifts off so you can put a battery tea light underneath.


I used heavyweight card stock for the structure of the house and then used the Notebook embossing folder to make "siding" pieces to go on all the walls. All the dies are from Tim Holtz's Village Die series.


The windows are scrap plastic colored with alcohol ink and coated with Stickles Rock Candy for extra sparkle.


I love the look of the light inside! Use a battery powered tea light.


Thanks for stopping by! I'm entering this into the Timeworn challenge on the Frilly & Funkie blog. Churches like this one are certainly from a by-gone era. =)


Dies Used: 
Sizzix (all Tim Holtz):
Village Dwelling (Sizzix / SSS
Village Manor (Sizzix / SSS)
Village Bell Tower (Sizzix / SSS
Village Rooftops (Sizzix / SSS
Village Winter (Sizzix / SSS )
Village Christmastime (Sizzix / SSS)

Other supplies:
Tim Holtz embossing folder Notebook
Tim Holtz Tiny Bells
Tim Holtz Wire Pin
Tim Holtz Decorative Deer
Tim Holtz Christmas Typed Tokens
Distress Ink – Picket Fence, Hickory Smoke, Pumice Stone
Alcohol Ink – Mushroom, Butterscotch
Distress Paint – Picket Fence
Distress Dry Glitter - Rock Candy
Stickles Rock Candy 

Simon Says Stamp and Sizzix links in this post are affiliate links which do not affect the price you pay but allow me to earn a small percentage of a sale. Thanks! (My husband also says thanks!)