Wednesday, February 22, 2017

More Clearsnap Blends from Eileen Hull


… and a closer look at a project from Creativations! All this month we've been taking a look at Eileen's ColorBox Blends from Clearsnap (check out all the fun projects on Eileen's blog if you've missed them). This is a project I made for Creativations using some of Eileen's new dies and the Blends ink for stenciling. (You can see my other Blends projects here and here.) I created a banner decor piece which I think is perfect for saying goodbye to winter with:


Isn't this cheerful? Eileen's new dies I used (coming soon to stores!) are the House/Pocket, Stitchy Flowers, and Stitchlits Words. Let's take a look:

The banner is cut from white cotton canvas material. I painted the background with watered down Distress Paint (Tumbled Glass and Twisted Citron). If I were redoing it, I could have made custom mists from the Blends inks (see how in my Mr. Owl tutorial) and used those on the background. The paint stiffens the fabric up a bit but the ink mist does not.

I used some of Wendy Vecchi's stencils (Layered Tree and Borders) and the Blends (Nutmeg, Frog and Hydranga)  to add the tree, hatched border on the bottom, and blue diamonds to the background. The Blends ink with its integrated sponge applicator makes it super easy to use for applying ink, especially through stencils.


Here is a detail of how I added the stitched words at the top of the banner. The Stitchlits Words die set is made up of individual word dies that you can use to cut anywhere on your project. It gives you holes that you can then easily stitch! I didn't have the actual die in my hands (Eileen sent us precut things to make show samples with) but that was not a problem. I used the cardstock with the diecut wording (on left) as a template and marked the dot positioning with a water erasable fabric pen. Then I just stitched with floss to connect the dots.

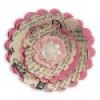
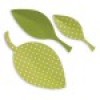
The house and flowers were cut out of wool felt (the dies cut felt wonderfully!) I stitched and glued all the little parts together and added extra decorative embroidery as well.

House detail

Flowers detail
I used vintage buttons and lace from my stash to add more layers. The grass diecuts I stitched on with my sewing machine.

The hanger was easy to make with the Twist & Style Tool. I used about a yard of silver 24 gauge wire doubled up (I didn't have thicker wire on hand) and twisted it into a sturdy length I could bend into the hanger shape.

I colored the wire with Mushroom Alcohol Ink to age it.
I drilled two holes at the ends of a length of dowel to pass the ends of the wires through. I twisted the ends into loops so I could attach the ribbon tassels to them. At the center I formed a decorative loop to hang it from. Also, I used the Nutmeg Blends ink to stain the wooden dowel. Quick and easy!


Thanks for stopping by! Be sure to head on over to Eileen's blog and see all the fabulous projects the Inspiration Team has made this month.


The supplies I used for this project can be found at Sizzix or Simon Says Stamp. Follow the links below and a shopping you may go!


Monday, February 20, 2017

AJVD Sneak Peek…

Hello! I have a post on the AJVD blog today. It's time to get all flowery now. =)


Head on over to the blog to see the whole thing! I know, I'm such a tease…

Wednesday, February 15, 2017

Mr. Owl Clearsnap Blog Takeover

Good morning everyone. Eileen Hull's Inspiration Team is taking over the Clearsnap blog this week! Head on over to see the full tutorial I made that shows you how to make this super cute stuffed Mr. Owl decoration.


He looks so whimsical sitting on my fireplace hearth. Love it! ;-)

Monday, February 13, 2017

Quick & Easy Valentine Treats

Good evening! Last Friday my son came home with a letter from his teacher telling about the Valentine's Day party they were going to have on Tuesday. DOH! I should have realized that was most likely coming but it was totally under my radar. Treats for his classmates! What to do? It's hard to justify buying premade stuff when I have a whole room filled with paper and craft supplies (ahem…) but it had to be something simple because I have lots going on at the moment. My Eileen Hull dies saved the day! I think the lollipop flower idea has been around for ages but I went with it (quick & easy right? no need to reinvent the wheel!)

The only thing I had to buy was the lollipops (and my fabulous, wonderful husband went grocery shopping for me and picked them up.)

So are you ready for this?

Step 1 – Cut out the parts you need. (I needed to make 14 of them.)


I used the largest layer from the 3-D Wrapped Flower Die and the middle sized leaf from the Leaves Die. Super easy and I even cut three layers at a time from double sided patterned paper I already had in my stash. (Some from my scrap bin, score!) I wrote the names of the recipients on the leaves.

Step 2 – Apply adhesive to one edge of the blossom part. Tuck the lollipop into the center and wrap the blossom around the top of the pop, overlapping the edges a bit.


Step 3 – Attach the leaf. I used washi tape from my stash. Stick a strip to the leaf and then wrap it around the lollipop stick right under the blossom.


All done!! That was painless wasn't it? ;-)


Thanks for stopping by. Happy Valentine's Day!! Guess I'd better come up with a party snack to send along with him tomorrow too. Hmmmm…


The supplies I used for this project can be found at Sizzix or Simon Says Stamp. Follow the links below and a shopping you may go!

FYI, the flower die is retired but still available for now on the Sizzix site (and it's on sale!)


Friday, February 10, 2017

Crazy Valentines

Good morning! I have some crazy valentines to pop into the mail but first I'm going to share them with you! Being far away now from many friends and family, I wanted to send them a little love this year and bring a smile to their faces. I think the "Crazy" line from Tim Holtz is perfect for doing that. All those funny little critters are certainly amusing!


I made a half dozen cards and used all sorts of techniques for the backgrounds – embossing, stenciling, monoprinting, diecutting…


and lots of different Distress inks and sprays. Also some washi tape and bakers' twine! These little guys are so much fun and if you have the matching die sets it makes it really quick and easy to cut them out. (I had to do the dogs by hand, I don't have that set yet. It made me really appreciate the others!)

Thanks for stopping by and I hope you have a chance to get crafty this weekend!

Again, I am also entering this into the Emerald Creek Dares Challenge 'Rock the Red'.


The supplies I used for this project can be found at Sizzix or Simon Says Stamp. Follow the links below and a shopping you may go!